
If your roof is leaking right now, stop what you are doing and take action immediately. A roof leak is never just a minor inconvenience — it is a full-blown emergency that demands your urgent attention right away. As a professional roofer with years of hands-on experience working across residential and commercial properties, I have responded to hundreds of emergency leak calls throughout my career. And every single time, the homeowners and property managers who acted fast paid significantly less and suffered far less damage than those who delayed even by a few hours.
Water is one of the most silently destructive forces your home will ever face. It does not announce itself loudly. It creeps through tiny gaps, travels along hidden pathways inside your roof structure, and causes devastating damage long before you even realize it is there. In just a few hours, a small drip can completely soak through layers of insulation, warp and rot structural wooden beams, stain and destroy drywall, trigger dangerous mold growth, and seriously compromise the structural integrity of your entire roof system. What starts as a simple $300 repair can spiral into a $10,000 nightmare if left unaddressed even for a short period of time.
This comprehensive guide will walk you through every critical step you need to take right now if your roof is actively leaking. We will cover emergency containment steps, how to locate the true source of the leak, safe temporary fixes, when and why to call a professional roofer, what repairs typically cost, how to handle your insurance claim, and how to protect your property from future leaks going forward.
Step 1: Stay Calm and Contain the Water Immediately
The moment you spot a roof leak, your number one priority is minimizing interior damage as quickly and effectively as possible. Panic will cost you time and money — fast, smart action will save both. Here is exactly what you need to do right away:
Contain the Water First
- Place Containers Everywhere — Grab every bucket, pot, trash can, or large container you can find and position them directly under all active dripping water points throughout the affected area immediately.
- Protect Your Floors — Lay down old towels, thick plastic sheeting, or waterproof tarps across all flooring surfaces to protect them from water damage and eliminate dangerous slipping hazards for everyone in the home.
- Control Sagging Ceilings — If your ceiling is visibly bulging or sagging due to water pooling above it, carefully puncture a small controlled hole at the lowest point using a screwdriver. This releases trapped water in a manageable stream rather than allowing the entire ceiling to suddenly and dangerously collapse under accumulated weight.
Protect Your Belongings
- Move Valuables Immediately — Remove all electronics, furniture, rugs, important documents, artwork, and any other valuables out of the affected area as quickly as possible. Water damage to personal belongings is frequently permanent and completely irreversible once it occurs.
- Prioritize Electronics First — Electronics are among the most immediately vulnerable items to water damage. Move laptops, televisions, gaming consoles, and any other devices to a completely dry area of your home first before anything else.
- Check Your Insurance Coverage — Be aware that your homeowner’s insurance policy may not fully cover the replacement value of every damaged personal item inside your home. Document all belongings before and after water exposure wherever time safely allows.
Electrical Safety Steps
- Unplug All Devices Immediately — Immediately unplug every electrical appliance, lamp, device, and extension cord in the water-affected area. Standing water and live electrical equipment together create an extremely serious and potentially fatal hazard.
- Turn Off Power at the Breaker — If water is dripping anywhere near your electrical panel, any wall outlet, light switch, or ceiling fixture, turn off electricity to that entire section of your home at the main breaker box immediately without any hesitation.
- Never Use Affected Fixtures — Do not attempt to use any light switches, electrical outlets, or appliances anywhere in the water-affected area under any circumstances until a qualified electrician has fully confirmed the area is completely safe.
Your Immediate Goal
Your single most important immediate goal right now is straightforward and clear — stop the water damage from spreading further, protect your family and belongings from harm, eliminate all electrical safety hazards, and then move quickly and calmly to the next critical steps outlined in this guide.
Step 2: Document All Damage Thoroughly Before Cleaning Up
Before you touch a single mop, sponge, or paper towel, pick up your phone and thoroughly document every single bit of damage you can see. Take clear detailed photos and videos of the ceiling damage, all visible water intrusion points, any staining on walls or floors, and all damage to your furniture and personal belongings. Capture wide establishing shots for overall context and tight close-up shots for specific damage detail. Make sure your photos are clearly timestamped.
Write down the exact time you first noticed the leak and describe the weather conditions thoroughly. Note whether there was a recent storm, prolonged heavy rain, strong wind, hail, snow, or ice in your area in the hours or days before the leak appeared. Record the date carefully and maintain a written log documenting how the damage progresses over the following hours. Insurance adjusters will ask all of these specific questions, and having accurate timestamped answers on record protects your financial interests enormously. Never skip this step — thorough documentation can be the decisive difference between a fully approved insurance claim and a frustratingly denied one.
Step 3: Locate the True Source of the Leak
Here is where many homeowners make a very costly mistake. They assume the leak is located directly above wherever the drip appears inside their home. In reality, water travels — sometimes quite far along rafters, beams, and sheathing — before dripping down into your living space. Water can enter your roof at one location and appear as a drip somewhere completely different inside your home.
How to Search Your Attic
If it is safe to do so, head up into your attic with a bright flashlight and carefully look for these specific signs:
- Wet or Stained Insulation — Heavily soaked or discolored insulation is one of the clearest and most reliable indicators of active water intrusion entering your roof system from above.
- Dark Water Stains on Rafters — Dark streaking marks running along rafters and roof sheathing show you the exact path water has been silently traveling inside your roof structure toward your living space.
- Daylight Through Roof Boards — Any visible daylight coming through your attic roof boards is a serious and urgent warning sign that demands immediate professional attention and repair without any further delay.
- Mold or Mildew Growth — Mold or mildew growth anywhere inside your attic strongly suggests a recurring or long-standing leak that has likely been present far longer than you currently realize.
- Active Dripping or Pooling Water — Any active dripping or pooling water should be carefully and patiently traced back toward the roof deck to identify the true original water entry point above.
Most Common Sources of Roof Leaks
The most common sources of roof leaks that professional roofers encounter regularly include the following:
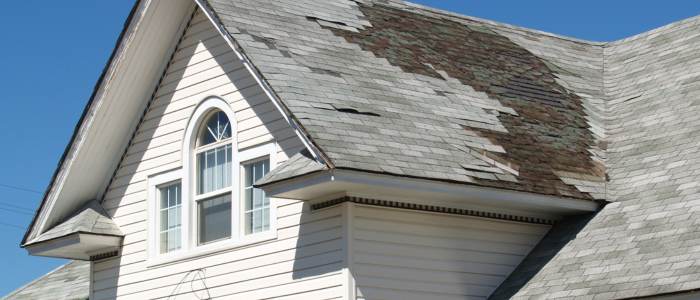
- Damaged or Missing Shingles — Shingles cracked, lifted, or completely removed by wind, storm impact, or hail are consistently the single most frequent culprit behind active residential and commercial roof leaks.
- Failed Flashing — Improperly installed, corroded, lifted, or completely failed metal flashing around chimneys, skylights, dormers, and plumbing vents is the second most common cause of persistent and recurring leaks.
- Cracked Pipe Boots — Deteriorated, hardened, or cracked rubber pipe boots around roof penetrations are extremely common leak sources that are frequently overlooked during routine visual maintenance inspections.
- Clogged Gutters — Heavily blocked gutters prevent proper water drainage, forcing water to back up destructively under shingles and fascia boards and creating direct entry points into your roof structure over time.
- Damaged Roof Valleys — Open, cracked, or improperly sealed roof valleys where two roof planes meet are consistently high-risk zones for water entry and require regular careful professional inspection.
- Ice Dams — Ice dams forming along roof eaves during winter months trap meltwater and force it aggressively backward up under shingles, causing significant hidden water damage in colder climates each season.
- Aging Roof Underlayment — Deteriorated or improperly installed underlayment beneath your shingles can allow significant water penetration even when the shingles above appear completely intact from ground level.
- Cracked Roof Deck Sheathing — Damaged or rotted roof deck sheathing allows water to bypass all other protective roofing layers and penetrate directly into your home structure below without obvious exterior warning signs.
- Skylight Seal Failure — Dried, cracked, or completely failed seals around skylight frames are a frequently overlooked but very common source of persistent water intrusion directly into upper floor living spaces.
- Ridge Cap Damage — Damaged, loose, or missing ridge cap shingles along the very peak of your roof leave one of the most vulnerable and heavily exposed areas completely unprotected from direct water and wind entry.
Step 4: Apply a Temporary Fix Only When It Is Completely Safe
Never under any circumstances climb onto a wet, icy, mossy, or steep roof during a storm or any dangerous weather conditions. Roof falls are consistently one of the leading causes of serious injury and death among homeowners attempting DIY emergency repairs. No property damage is ever worth your life, your health, or your physical safety.
Safety Warnings Before You Begin
- Never Access a Wet Roof — A wet, icy, or moss-covered roof surface is extremely slippery and unpredictable. Even experienced professional roofers will not work under these dangerous conditions.
- Avoid Working Alone — Always have another responsible adult present whenever you are working at any height. If you slip or fall, someone needs to be there immediately to call for emergency help.
- Use Proper Footwear — If conditions are safe and you must access your roof, always wear rubber-soled non-slip footwear specifically designed for working at heights. Never attempt roof access in sandals, socks, or smooth-soled shoes.
- Know Your Limits — If you feel uncomfortable, unsteady, or uncertain at any point, stop immediately and wait for a professional roofer to handle the situation safely and correctly.
Temporary Fix Options
- Install a Roofing Tarp — A heavy-duty polyethylene roofing tarp placed generously over the damaged area and secured firmly with wooden boards or heavy sandbags is the single most effective temporary solution available. Ensure the tarp extends at least three to four feet beyond the visibly damaged area on every side for maximum reliable coverage and protection.
- Apply Roofing Cement or Sealant — For small visible cracks or gaps around flashing joints, chimney bases, or pipe penetrations, roofing cement applied carefully with a putty knife creates a meaningful short-term waterproof seal that significantly reduces active water intrusion.
- Use Waterproof Tape — Heavy-duty waterproof flashing tape applied firmly over small visible cracks in flashing can provide an additional short-term barrier against immediate water entry when roofing cement is not immediately available.
- Place Plastic Sheeting in Attic — If you can safely access your attic, placing thick plastic sheeting directly over wet insulation and under the damaged roof deck area helps redirect dripping water into controlled collection points below.
Clear Your Gutters Safely
- Clear Clogged Gutters from a Ladder — Carefully clearing blocked gutters and downspouts from a stable ground-level ladder is a practical, safe, and genuinely helpful step that can immediately reduce water backup contributing to your active leak.
- Check All Downspouts — Verify that every downspout is completely clear and actively directing water well away from your home’s foundation. Blocked downspouts force water to overflow and pool directly against your foundation walls.
- Flush Gutters with a Garden Hose — After manually removing all visible debris, flush your gutters thoroughly with a garden hose to clear any remaining smaller blockages and confirm water is flowing freely through your entire gutter system.
- These Are Temporary Measures Only — Every single one of these steps buys you valuable time but does not permanently fix your roof leak. A licensed professional roofer must properly inspect and repair the true underlying source of the damage.
Step 5: Call a Licensed Roofing Professional Without Delay
This is without question the single most important step in this entire guide. A qualified, licensed, and fully insured roofing professional brings specialized skills, professional-grade tools, and deep practical experience that no amount of DIY effort can ever adequately replicate or replace.
What a Professional Roofer Will Do
- Safely Inspect Your Entire Roof — A licensed roofer will safely access your roof under proper controlled conditions and identify the true root source of the leak rather than simply treating the visible symptoms you can observe from inside your home.
- Assess All Hidden Water Damage — They will conduct a thorough systematic assessment of the complete extent of water damage including all hidden deterioration inside your roof structure, compromised attic insulation, and stressed load-bearing components you cannot safely evaluate yourself.
- Provide the Right Repair Solution — They will recommend the most appropriate, building code-compliant, and genuinely cost-effective repair solution specifically suited to your roof type, current age, overall condition, and available budget.
- Execute Professional Quality Repairs — They will execute all repairs using professional-grade materials backed by manufacturer warranties and proven thoroughly tested installation techniques genuinely built to protect your home reliably for many years ahead.
- Identify Secondary Damage — An experienced roofer will also look beyond the obvious damage and identify any secondary issues such as compromised ventilation, deteriorated underlayment, or weakened structural components that could cause future problems if left unaddressed today.
- Provide Full Written Documentation — A reputable professional will provide complete written documentation of all damage found, all repairs performed, all materials used, and all warranties applicable to the completed work for your personal records.
How to Choose the Right Roofing Contractor
- Verify Licensing and Insurance — Always verify that your chosen contractor carries full current liability insurance and proper licensing before allowing them anywhere near your property. Never hire any roofing contractor who cannot immediately provide documented proof of both.
- Check Local Experience and Reviews — Look for well-documented local experience and a consistently strong track record of positive verified customer reviews on reputable platforms. Local contractors have a community reputation to protect and are far more accountable than out-of-town operators.
- Always Get a Written Estimate — Request a clear, detailed, fully itemized written estimate before any work whatsoever begins. Never accept a verbal quote alone as sufficient — verbal agreements leave you completely unprotected if disputes arise later.
- Ask About Warranties — Ask specifically about warranties covering both materials and labor before signing anything. Reputable confident roofing contractors always stand firmly behind the quality of their completed work with meaningful warranty coverage.
- Get Multiple Quotes — Whenever time allows, obtain at least two or three written quotes from different licensed local contractors before making your final decision. Comparing quotes helps you understand fair market pricing clearly.
Red Flags to Watch Out For
- Pressure to Replace Immediately — Be extremely cautious of any contractor who aggressively pressures you into an immediate full roof replacement without first conducting a thorough independent inspection. Many legitimate leaks require only targeted repairs rather than full costly replacement.
- Large Upfront Cash Demands — Never agree to pay a large upfront cash payment before any work has begun. Reputable contractors typically request only a reasonable deposit with the remainder due upon satisfactory completion of all agreed work.
- No Proof of Insurance or Licensing — Any contractor who cannot immediately and confidently provide fully verifiable proof of current licensing and comprehensive liability insurance should be dismissed completely without exception.
- Storm Chasers and Door Knockers — Be very wary of contractors appearing unsolicited at your door immediately following a storm offering suspiciously discounted emergency repairs. These storm chasers frequently perform substandard work and disappear before any warranty claims can ever be made.
How Much Does Roof Leak Repair Typically Cost?
Repair costs vary considerably based on the severity of the damage, the specific type and age of roofing material involved, the exact location of the leak, and prevailing labor rates in your local market. Here is a realistic comprehensive cost breakdown for the most common roof leak repair types:
| Repair Type | Average Cost |
|---|---|
| Minor shingle repair or patch | $150 – $400 |
| Flashing repair around chimney or skylight | $200 – $600 |
| Pipe boot or penetration seal replacement | $150 – $500 |
| Roof valley repair | $300 – $800 |
| Fascia or soffit board repair | $500 – $1,500 |
| Gutter repair or full replacement | $200 – $1,000 |
| Roof underlayment repair or replacement | $500 – $1,500 |
| Major structural or decking repair | $1,000 – $3,500 |
| Flat roof membrane repair | $300 – $1,500 |
| Partial roof replacement | $2,000 – $8,000 |
| Full roof replacement | $5,500 – $15,000+ |
Acting quickly and decisively almost always keeps your total repair cost firmly in the lower end of these ranges. Delaying repairs by even a few days consistently and predictably turns small manageable costs into major avoidable financial burdens.
Does Homeowner’s Insurance Cover Roof Leaks?
Understanding your homeowner’s insurance coverage for roof leaks can potentially save you thousands of dollars. Standard homeowner’s insurance policies are specifically designed to cover sudden and accidental damage caused by clearly defined covered perils including windstorms, severe rainstorms, hailstorms, lightning strikes, falling trees, and in certain policy types, damage caused by the weight accumulation of heavy ice or snow loads.
If a severe storm directly caused your roof to leak by damaging shingles, tearing flashing loose, or causing a tree to fall onto your roof structure, that damage is almost certainly covered under your standard policy. However if your roof has been gradually deteriorating over many years due to normal aging or deferred maintenance, your insurance company will almost certainly classify the resulting damage as a preventable maintenance issue and deny the claim entirely.
To give your insurance claim the strongest possible chance of full approval follow these important steps. Document all visible damage immediately with dated photos and videos before any cleanup begins. File your claim with your insurer as promptly as possible after discovering the damage. Obtain a detailed professional written damage assessment from a licensed roofing contractor to support your claim credibly. And avoid authorizing any permanent repairs until your insurance adjuster has fully completed their official on-site inspection.
Warning Signs Your Roof May Be About to Leak
If your roof is not currently leaking but you want to stay ahead of potential problems before they become costly emergencies, watch carefully for these important warning signs:
Interior Warning Signs
- Water Stains on Ceilings — Yellowish-brown discoloration appearing on your ceilings are early reliable indicators of ongoing hidden moisture intrusion actively working through your roof system.
- Wall Discoloration — Brown or yellow staining on your upper interior walls near the roofline suggests water is traveling down inside your wall cavities requiring urgent attention.
- Peeling Interior Paint — Paint bubbling or peeling on ceilings or upper walls near the roofline strongly indicates trapped moisture working through your roof structure into your living spaces below.
- Mold or Musty Smells — Persistent mold growth or musty odors in your attic or upper floor living spaces reliably indicate ongoing hidden moisture problems developing within your roof system.
- Increased Energy Bills — A sudden unexplained spike in your heating or cooling costs can strongly indicate that your roof insulation has been compromised and saturated by moisture intrusion.
Exterior Warning Signs
- Curling or Missing Shingles — Shingles that are visibly curling, cracking, buckling, or completely missing leave your roof deck dangerously exposed and completely unprotected from direct water entry.
- Excessive Granule Loss — Large amounts of asphalt shingle granules collecting in your gutters signal that your shingles are rapidly deteriorating and approaching the end of their effective protective service life.
- Sagging Roof Deck Areas — Sagging or visibly uneven areas across your roof deck strongly suggest serious structural deterioration and potential rot occurring beneath the surface.
- Damaged or Missing Flashing — Damaged, loose, corroded, or missing metal flashing around chimneys, skylights, and roof vents are among the most direct and common precursors to active recurring leaks.
- Visible Moss or Algae Growth — Green moss or dark algae streaks growing across your shingle surface trap destructive moisture against the roof accelerating shingle deterioration and leading directly to active leaks over time.
Age and Maintenance Warning Signs
- Roof Over 20 Years Old — Any roof 20 years or older without a recent professional inspection is statistically well overdue for significant hidden problems and should be evaluated without any further delay.
- No Recent Professional Inspection — If you cannot clearly remember the last time a licensed roofer professionally inspected your roof, that alone is a serious warning sign requiring immediate action.
- Chimney Mortar Deterioration — Cracked or crumbling mortar between chimney bricks allows water to penetrate directly into the chimney structure and work its way into your home through the surrounding roof area.
Scheduling a thorough professional roof inspection twice per year — ideally in early spring after winter weather stress and again in early fall before winter arrives — is one of the smartest and most cost-effective maintenance investments any homeowner or commercial property manager can possibly make to protect their property long term.
FAQs
How Do I Know If My Roof Leak Is Serious?
Every active leak is serious. Watch for water near electrical fixtures, sagging ceilings, visible mold growth, or soft rotted wood in your attic. These signs indicate deep structural damage requiring immediate professional attention. Never ignore an active leak — call a roofer today.
Can I Fix a Roof Leak Myself?
Basic containment like placing buckets and tarps is fine. However, a proper lasting repair requires a licensed professional. DIY repairs risk personal injury, worsening the damage, voiding material warranties, and complicating your insurance claim. Always call a qualified roofer for the actual repair work.
How Long Can I Wait Before Repairing a Roof Leak?
You cannot afford to wait even 24 hours. Mold begins growing within 24 to 48 hours. Wood rots within days. A $300 repair today can become a $10,000 project within weeks. Act immediately — every hour of delay makes the damage significantly worse and more expensive.
Will My Homeowner’s Insurance Pay for Roof Leak Repairs?
Insurance typically covers sudden storm damage including wind, hail, and falling trees. It does not cover leaks caused by age or neglect. Document everything, file your claim promptly, and get a written roofer assessment to support your claim and maximize your chances of full approval.
Final Thoughts
A leaking roof is one of the most stressful situations any homeowner or commercial property owner can face. But the good news is this — when you act fast, stay calm, and make the right decisions, most roof leaks are completely fixable without breaking the bank.
The steps are straightforward. Contain the water. Document the damage thoroughly. Apply a safe temporary fix if conditions allow. And most importantly, call a licensed experienced roofing professional as soon as possible. Every hour you delay gives water more time to destroy your insulation, rot your wood, grow mold, and drive up your repair bill.
Your roof is your home’s first and most important line of defense against the elements. It protects everything and everyone you care about. Treat it with the urgency it deserves.
Do not wait for the damage to get worse. One phone call to a trusted local roofer today can save you thousands of dollars and weeks of stress tomorrow. Act now — your home is counting on you.